24v Inverter
Inverter Installation.
There are many varieties of inverters in the market place, some expensive some cheap and some I am sure are not exactly what you expected. I chose to stay with a product I had used before supplied by a well known solar company found on the internet.
Photonic Universe have a wide rang of solar products as well as all of the necessary hardware to install solar to your home or home away from home, I have dealt with them in the past and they are quick to answer questions and offer practical advice on the products they sell.
I chose a 24v 2000 watt inverter, why? Well a number of reasons really, 24volt is half of the amperage of a 12 volt system and at 2000 watts peak you could be seeing 180 amp drawn on a 12v system so big cables and short cable lengths are in order as well as massive batteries, I don’t have the space for a massive battery bank so again the 24v offers alternative options, dealing with the same 2000 watts peak the 24v option will draw 90 amps.

The choice of 24v also reduces some costs in controlling the system, 100 amp relays are a lot cheeper than a 200 amp one, as well as the smaller cabling. The batteries need to be big enough to handle the drain and also small enough to fit into the limited space in Iron Cat.
As the batteries were to be inboard they needed to be sealed so cheap conventional flooded batteries were of no use, after much research I opted for 2 130 amp Leoch AGM batteries that are sealed and can be mounted in almost any orientation, the 130 amp capacity should give me near 65 amps of usable power before I start to damage the batteries despite the AGM being more tolerant to deep discharge.
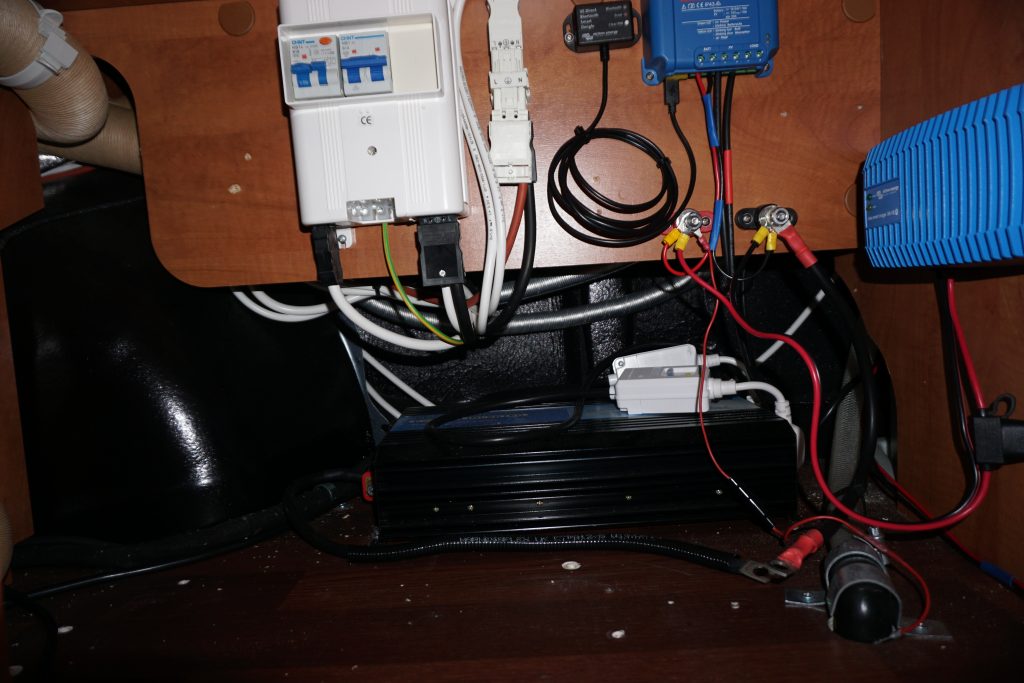
I did a dry run fitment into one of the under bed lockers that also houses the mains consumer unit, I am undecided if I am going to combine this within the inverter system or just install a stand alone system. I have since decided to run separate plug points for the inverter, combining the two systems would be tricky and harder to manage I feel that when on mains hook up the supplied plugs within Iron Cat are adequate, when wild camping the careful positioning of just two points powered by the inverter would provide the necessary flexibility and power everything 230v that we needed.
I mounted and secured the two batteries by screwing an aluminium frame together with angle sections and securing it to the wood floor, small webbing straps hold the batteries down in place this was just a temporary measure to allow the fitment of the various elements I intended to incorporate in the final installation.
Once proven that it all works more permanent fixings will be made, the old saying measure twice cut once comes to mind.
The first addition to the two fixed batteries was a fuse, I use cube fuses that allow the protection to start at the battery terminal, the small busbar carries two cube fuses, a 100 amp for the inverter and a second 40 amp for the remaining circuits to be powered by the battery bank.

Why two circuits?
Well I want to be able to isolate the inverter but still keep other consumers live I intend to put a 25 amp 24v to 12v dropper in the system to take care of the tv and other entertainment, I reasoned that the less strain on the habitation batteries the longer we could wild camp with the fridge being the only real consumer. The 25 amp dropper I chose can also act as a battery charger so could in theory be used to charge the habitation batteries in extreme situations .

The use as a charger may become redundant as I can power the 12v habitation solar controller from the 24v batteries and this will act as a battery charger, it will not be the most efficient method but every little helps.
This additional 12v supply will power the 12v Avtex tv, the 12v Avtex bar speaker, the usb points my laptop and anything else 12v I can find to power from it. All AA & AAA batteries we use are rechargeable and the smart charger we use is also powered by 12v.